> For the complete documentation index, see [llms.txt](https://johnoraw.gitbook.io/lnp/llms.txt). Markdown versions of documentation pages are available by appending `.md` to page URLs; this page is available as [Markdown](https://johnoraw.gitbook.io/lnp/2.gns3/appliances/iosv-router.md).

# IOSv Router

In this session we will install a modern virtual router running Cisco IOX-XE. This is a good device to use on a cloud course, it is a virtual router, this is network functions virtualization (NFV). I am going to assume from the previous session that you know how to install an appliance.

Before you begin, obtain the correct firmware images from your lecturer.

Open the previous project (**IOSvL2**) and save it as **IOSv**.

1. Open the all-devices tab and click **+** to install a new template.
2. Select to **Install from the GNS3 server**

<figure><img src="https://3973593522-files.gitbook.io/~/files/v0/b/gitbook-x-prod.appspot.com/o/spaces%2FbuXMcoW2S0X8KE0jLpdN%2Fuploads%2FnmfCttm7p8lawBjvqwtL%2Fimage.png?alt=media&amp;token=89b43c1e-bdf5-4974-94de-76f245944358" alt=""><figcaption></figcaption></figure>

3. Select the IOSv Router

<figure><img src="https://3973593522-files.gitbook.io/~/files/v0/b/gitbook-x-prod.appspot.com/o/spaces%2FbuXMcoW2S0X8KE0jLpdN%2Fuploads%2FGfbMiPWKnznhyDrvhAQR%2Fimage.png?alt=media&amp;token=21c5125f-89b6-4fcd-8da4-3283c1f2f6e9" alt=""><figcaption></figcaption></figure>

4. Install on the Server VM

<figure><img src="https://3973593522-files.gitbook.io/~/files/v0/b/gitbook-x-prod.appspot.com/o/spaces%2FbuXMcoW2S0X8KE0jLpdN%2Fuploads%2FgWN0Po5WGazhPDxHGQR8%2Fimage.png?alt=media&amp;token=f7ae174a-2778-4a44-8399-d0f0766a7e17" alt=""><figcaption></figcaption></figure>

5. Accept the default QEMU.
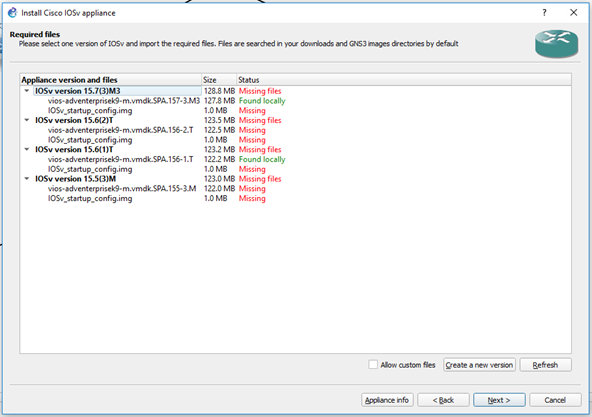
6. Because the images were already in my downloads folder, there were detected automatically.

<figure><img src="https://3973593522-files.gitbook.io/~/files/v0/b/gitbook-x-prod.appspot.com/o/spaces%2FbuXMcoW2S0X8KE0jLpdN%2Fuploads%2F4tmpvMNjgNjUpskQEPhw%2Fimage.png?alt=media&amp;token=1c3a3246-d9c8-4c3b-a2c5-e250dc08e64a" alt=""><figcaption></figcaption></figure>

7. I still needed to click on the .img file and manually find them!

<figure><img src="https://3973593522-files.gitbook.io/~/files/v0/b/gitbook-x-prod.appspot.com/o/spaces%2FbuXMcoW2S0X8KE0jLpdN%2Fuploads%2F4ClzZPG3Hha57DXgAyNV%2Fimage.png?alt=media&amp;token=f821372f-3aaa-4042-ad1e-6614203ed0ff" alt=""><figcaption></figcaption></figure>

8. Finished.

<figure><img src="https://3973593522-files.gitbook.io/~/files/v0/b/gitbook-x-prod.appspot.com/o/spaces%2FbuXMcoW2S0X8KE0jLpdN%2Fuploads%2FPn7rvLNhKPMeLr14yXpO%2Fimage.png?alt=media&amp;token=1826df74-e3e4-4015-9310-ec3937368c0b" alt=""><figcaption></figcaption></figure>

9. I drag and drop the router into the project and start it.
10. I connect one interface (GigabitEthernet0/0) to an existing switch and configure as shown.

<figure><img src="https://3973593522-files.gitbook.io/~/files/v0/b/gitbook-x-prod.appspot.com/o/spaces%2FbuXMcoW2S0X8KE0jLpdN%2Fuploads%2FovTF3cT0gNf9e8nNmYTI%2F4.PNG?alt=media&amp;token=80bf796c-45a1-4b63-817d-5e2d078291ad" alt=""><figcaption></figcaption></figure>

11. I configure the router with the following.

```
# Router1
en
conf t

hostname router1
int gi0/0
 ip address 192.168.1.254 255.255.255.0
exit
exit
wr mem
```

12. Finally, I test. I should be able to ping each device from every other device.

## Finally

You must save the configuration of each device as you would in the real world. At the console of each device, type **write memory**, most of us shorten that to **wr mem**

Save your work and exit, you can then shut down GNS3.